This article walks you through the first steps of creating an OPC UA solution based on Eclipse Milo. OPC UA, also known as IEC 62541, is an IoT solution for connecting industrial automation systems. Eclipse Milo™ is an open-source Java based implementation.
Please note: In the recent 0.3.x release of Milo, the APIs have been changed. This blog post still uses the old APIs of Milo 0.2.x. However I wrote a new blog post, which covers the changes in Milo 0.3.x, compared to this blog post. Since the new post only covers the changes, I encourage you to read on, as everything else in this blog post is still valid.
What is OPC UA?
OPC UA is a point-to-point, client/server based communication protocol used in industrial automation scenarios. It offers APIs for telemetry data, command and control, historical data, alarming and event logs. And a bit more.
OPC UA is also the successor of OPC DA (AE, HD, …) and puts a lot more emphasis on interoperability than the older, COM/DCOM based, variants. It not only offers a platform neutral communication layer, with security built right into it, but also offers a rich set of interfaces for handling telemetry data, alarms and events, historical data and more. OPC clearly has an industrial background as it is coming from an area of process control, PLC, SCADA like systems. It is also known as IEC 62541.
Looking at OPC UA from an MQTT perspective one might ask, why do we need OPC UA? Where MQTT offers a completely undefined topics structure and data types, OPC UA provides a framework for standard and custom datatypes, a defined (hierarchical) namespace and a definition for request/response style communication patterns. Especially the type system, even with simple types, is a real improvement over MQTT’s BLOB approach. With MQTT you never know what is inside your message. It may be a numeric value encoded as string, a JSON encoded object or even a picture of a cat. OPC UA on the other side does offer you a type system which holds the information about the types, in combination with the actual values.
OPC UA’s subscription model also provides a really efficient way of transmitting data in a lively manner, but only transmitting data when necessary as defined by client and server. In combination with the binary protocol this can a real resource safer.
The architecture of Eclipse Milo
Traditionally OPC UA frameworks are split up in “stack” and “SDK”. The “stack” is the core communication protocol implementation. While the “SDK” is building on top of that, offering a simpler application development model.

Eclipse Milo offers both “stack” and “SDK” for both “client” and “server”. “core” is the common code shared between client and server. This should explain the module structure of Milo when doing a search for “org.eclipse.milo” on Maven Central:
org.eclipse.milo : stack-core
org.eclipse.milo : stack-client
org.eclipse.milo : stack-server
org.eclipse.milo : sdk-core
org.eclipse.milo : sdk-client
org.eclipse.milo : sdk-server
Connecting to an existing OPC UA server would require you to use “sdk-client” only, as all the other modules are transient dependencies of this module. Likewise, creating your own OPC UA server would also only require the “sdk-server” modules.
Making contact
Focusing on the most common use case of OPC, data acquisition and command & control, we will now create a simple client which will read out telemetry data from an existing OPC UA server.
The first step is to look up the “endpoint descriptors” from the remote server:
EndpointDescription[] endpoints =
  UaTcpStackClient.getEndpoints("opc.tcp://localhost:4840")
    .get();
The trailing .get() might have tipped you off that Milo makes use of Java 8 futures and thus easily allows asynchronous programming. However this example will use the synchronous .get() call in order to wait for a result. This will make the tutorial more readable as we will look at the code step by step.
Normally the next step would be to pick the “best” endpoint descriptor. However “best” is relative and highly depends on your security and connectivity requirements. So we simply pick the first one:
OpcUaClientConfigBuilder cfg = new OpcUaClientConfigBuilder();
cfg.setEndpoint(endpoints[0]);
Next we will create and connect the OPC client instance based on this configuration. Of course the configuration offers a lot more options. Feel free to explore them all.
OpcUaClient client = new OpcUaClient(cfg.build());
client.connect().get();
Node IDs & the namespace
OPC UA does identify its elements, objects, folders, items by using “Node IDs”. Each server has multiple namespaces and each namespace has a tree of folders, objects and items. There is a browser API which allows you to browse through this tree, but this is mostly for human interaction. If you know the Node ID of the element you would like to access, then you can simply provide the node ID. Node IDs can be string encoded and might look something like ns=1;i=123. This example would reference to a node in namespace #1 identified by the numeric id “123”. Aside from numeric IDs, there as also string IDs (s=), UUID/GUID IDs (g=) and even a BLOB type (b=).
The following examples will assume that a node ID has been parsed into variables like nodeId, which can be done by the following code with Milo:
NodeId nodeIdNumeric = NodeId.parse("ns=1;i=42");
NodeId nodeIdString  = NodeId.parse("ns=1;s=foo-bar");
Of course instances of “NodeId” can also be created using the different constructors. This approach is more performant than using the parse method.
NodeId nodeIdNumeric = new NodeId(1, 42);
NodeId nodeIdString  = new NodeId(1, "foo-bar");
The main reason behind using Node IDs is, that those can be efficiently encoded when they are transmitted. For example is it possible to lookup an item by a larger string based browse path and then only use the numeric Node ID for further interaction. Node IDs can also be efficiently encoded in the OPC UA binary protocol.
Additionally there is a set of “well known” node IDs. For example the root folder always has the node ID ns=0;i=84. So there is no need to look those up, they can be considered constants and be directly used. Milo defines all well known IDs in the Identifiers class.
Reading data
After the connection has been established we will request a single read of a value. Normally OPC UA is used in an event driven manner, but we will start simple by using a single requested read:
DataValue value =
  client.readValue(0, TimestampsToReturn.Both, nodeId)
    .get();
The first parameter, max age, lets the server know that we may be ok reading a value which is a bit older. This could reduce traffic to the underlying device/system. However using zero as a parameter we request a fresh update from the value source.
The above call is actually a simplified version of a more complex read call. In OPC UA items do have attributes and there is a “main” attribute, the value. This call defaults to reading the “value” attribute. However it is possible to read all kinds of other attributes from the same item. The next snippet shows the more complex read call, which allows to not only read different attributes of the item, but also multiple items at the same time:
ReadValueId readValueId =
  new ReadValueId(nodeId, AttributeId.Value.uid(), null, null);

ReadResponse response =
  client
    .read(0, TimestampsToReturn.Both, Arrays.asList(readValueId))
      .get();
Also for this read call we do request both, the server and source timestamp. OPC UA will timestamp values and so you know when the value switched to this reported value. But it is also possible that the device itself does the timestamping. Depending on your device and application, this can be a real benefit to your use case.
Subscriptions
As already explained, OPC UA can do way better than explicit single reads. Using subscriptions it is possible to have fine grained control over what you request and even how you request data.
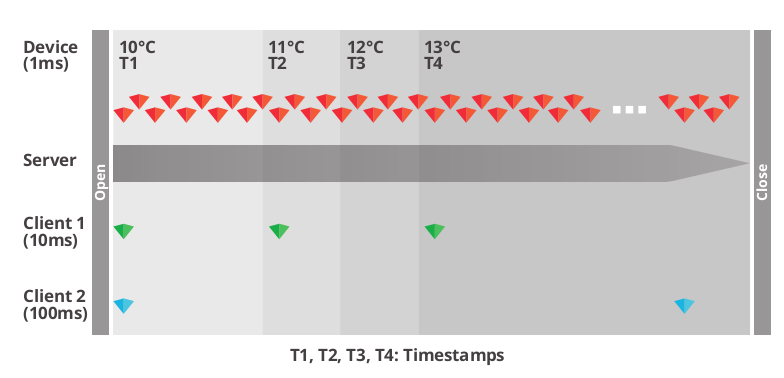
When coming from MQTT you know that you get updates once they got published. However you have no control over the frequency you get those updates. Imagine your data source is originally some temperate sensor. It probably is capable of supplying data in a sub-microsecond resolution and frequency. But pushing a value update every microsecond, even if no one listens, is a waste of resources.
In OPC UA
OPC UA does allow you to take control over the subscription process from both sides. When a client creates a new subscription it will provide information like the number of in-flight events, the rate of updates, … the server has the ability to modify the request, but will try to adhere to it. It will then start serving the request. Also will data only be sent of there are actual changes. Imagine a pressure sensor, the value may stay the same for quite a while, but then suddenly change rather quickly. So re-transmitting the same value over and over again, just to achieve high frequency updates when an actual change occurs is again a waste of resources.

In order to achieve this in OPC UA the client will request a subscription from the server, the server will fulfill that subscription and notify the client of both value changes and subscription state changes. So the client knows if the connection to the device is broken or if there are simply no updates in the value. If no value changes occurred nothing will be transmitted. Of course there is a heartbeat on the OPC UA connection level (one for all subscriptions), which ensures detection communication loss as well.
In Eclipse Milo
The following code snippets will create a new subscription in Milo. The first step is to use the subscription manager and create a new subscription context:
// what to read
ReadValueId readValueId =
    new ReadValueId(nodeId, AttributeId.Value.uid(), null, null);

// monitoring parameters
int clientHandle = 123456789;
MonitoringParameters parameters =
    new MonitoringParameters(uint(clientHandle), 1000.0, null, uint(10), true);

// creation request
MonitoredItemCreateRequest request =
    new MonitoredItemCreateRequest(readValueId, MonitoringMode.Reporting, parameters);
The “client handle” is a client assigned identifier which allows the client to reference the subscribed item later on. If you don’t need to reference by client handle, simply set it so some random or incrementing number.
The next step will define an initial setup callback and add the items to the subscription. The setup callback will ensure that the newly created subscription will be able to hook up listeners before the first values are received from the server side, without any race condition:
// The actual consumer

BiConsumer<UaMonitoredItem, DataValue> consumer =
  (item, value) ->
    System.out.format("%s -> %s%n", item, value);

// setting the consumer after the subscription creation

BiConsumer<UaMonitoredItem, Integer> onItemCreated =
  (monitoredItem, id) ->
    monitoredItem.setValueConsumer(consumer);

// creating the subscription

UaSubscription subscription =
    client.getSubscriptionManager().createSubscription(1000.0).get();

List<UaMonitoredItem> items = subscription.createMonitoredItems(
    TimestampsToReturn.Both,
    Arrays.asList(request),
    onItemCreated)
  .get();
Taking Control
Of course consuming telemetry data is fun, but sometimes it is necessary to issue control commands as well. Issuing a command or setting a value on the target device is as easy as:
client
  .writeValue(nodeId, DataValue.valueOnly(new Variant(true)))
    .get();
This snippet will send the value TRUE to the object identified by nodeId. Of course, like for the read, there are more options when writing values/attributes of an object.
But wait … there is more!
This article only scratched the complex topic of OPC UA. But it should have given you a brief introduction in OPC UA and Eclipse Milo. And it should get you started into OPC UA from a client perspective.
Watch out for the repository ctron/milo-ece2017 which will receive some more content getting into OPC UA and Eclipse Milo and which will be accompanying repository for my talk Developing OPC UA with Eclipse Milo™ at EclipseCon Europe 2017.
I would like to thank Kevin Herron for not only helping me with this article, but for helping me so many times understanding Milo and OPC UA.
Also see:
- eclipse/milo at GitHub
- Eclipse IoT
- Milo project page