In part #1 and part #2, we saw how easy it is to interface Apache Camel with Kura Wires. Simply by re-using some existing functionality. A few lines of XML, Groovy and you can already build an IoT solution based on the Camel ecosystem and the Eclipse Kura runtime. This part will focus on the Java DSL of Apache Camel.
It will also take into account, that when you develop and deploy an application, you need some kind of development, test and integration environment. When you build something, no matter how big, based on Camel or Kura Wires, you do want to test it. You want to have unit tests, and the capability to automatically test if your solution works, or still works after you made changes.
Using Kura Wires alone, this can be a problem. But Camel offers you a way to easily run your solution in a local IDE, debugging the whole process. You can have extra support for debugging Camel specific constructs like routes and endpoints. Camel has support for JUnit and e.g. using the “seda” endpoints, you can in create an abstraction layer between Camel and Wires.
The goal
I’ll make this one up (and yes, let’s try to keep it realistic). We have a device, and his device allows to set two parameters for its operation (P1 and P2, both floating points). Now we already have the device connection set up in Kura. Maybe using Modbus, or something else. Kura can talk to it using Kura Wires and that is all that counts.
Now we do get two additional requirements. There is some kind of operating panel next to the device, which should allow viewing and setting those parameters locally. Also, those parameters should be accessible, using IEC 60870-5-104, for an additional device, right next to the Kura gateway.
All of those operations have to be local only, and still work when no connection to the cloud is possible. But of course, we don’t want to lose the ability to monitor the parameters from our cloud system.
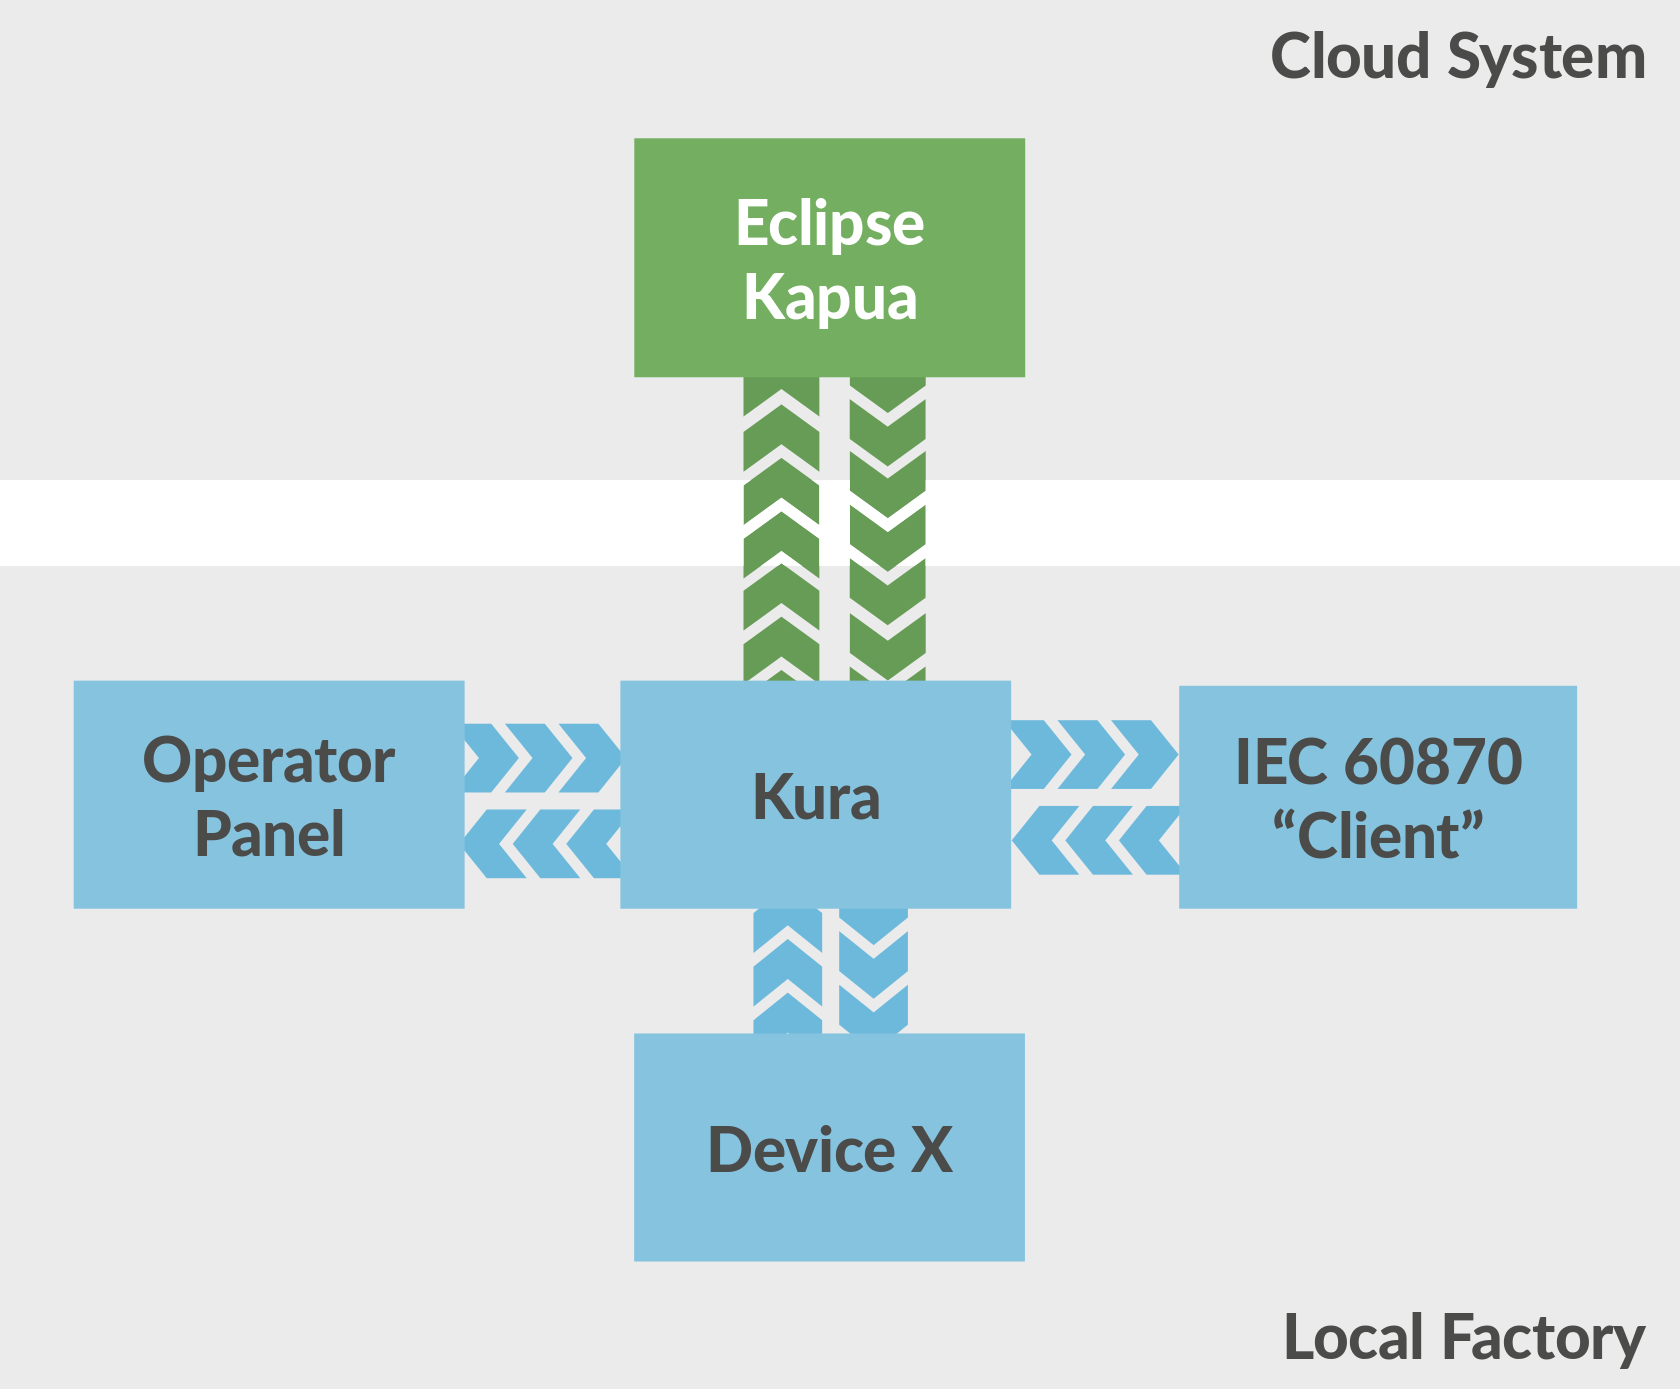
The operator panel will, of course, be programmed in the newest and hippest Web UI technology possible. It is super easy to fire a few HTTP API calls and encode everything in JSON. While, at the same time, the IEC 60870 layer has no idea about complex data structures. The panel application will send a full update of both parameters, while the 60870 client, due to the nature of this protocol, will only send one parameter at a time.
Doesn’t sound too unrealistic, does it?
The project structure
The full project source code is available at ctron/kura-examples, on GitHub. So this blog post will only focus on some important spots of the whole project.
The project is a standard Maven project, and thus has the typical project structure:
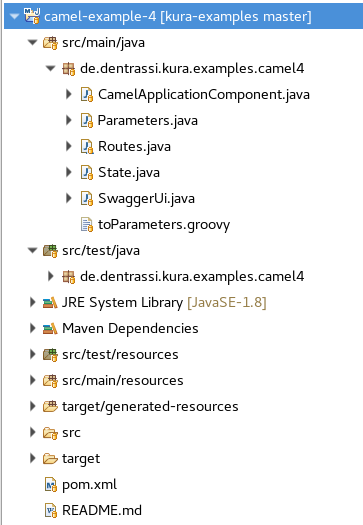
There are only three important differences to a standard Java Maven project:
The packaging type is bundle, which requires the maven-bundle-plugin. It will create an OSGi bundle JAR, instead of a plain JAR file. This is required as the Kura IoT gateway is based on OSGi.
We will create a “DP” package at the end of the build, using the OSGi DP Maven Plugin. This package can directly be uploaded to the Kura instance. As this plugin does include direct dependencies, but doesn’t include transient dependencies (on purpose), the project declares a few dependencies as “provided” to prevent them from being re-packaged in the final DP package.
The project uses the maven-antrun-plugin to download and unpack the static Swagger UI resources. Swagger UI is just a convenience for playing around with the REST API later on. Camel will take care of creating the OpenAPI (Swagger) JSON description, even if the SwaggerUI part is removed. So in a production setup, you most likely would not add Swagger UI to the deployment.
Starting it up
The project has three entry points:
CamelApplicationComponentis the OSGi service, which will be managed by the OSGi service component runtime (SCR) when the component is uploaded to Kura.TestApplicationis a local test application, which is intended to be started from the local IDE for manual testing.CamelApplicationComponentTestis the JUnit 4 based test for testing the Camel routes.
All three entry points will have a slightly different creation process for the Camel Context. This is simply due to the fact that different environments (like plain Java, OSGI and JUnit) have different requirements.
The routes configuration, which is the same for all entry points, is located in Routes.
Let’s have a quick look at the OSGi startup:
@Activate
public void start(final BundleContext context) throws Exception {
  this.context = new OsgiDefaultCamelContext(context, SwaggerUi.createRegistry());
  this.context.addRoutes(new Routes(this.state));
  this.context.start();

  final Dictionary<String, Object> properties = new Hashtable<>();
  properties.put("camel.context.id", "camel.example.4");
  this.registration = context.registerService(CamelContext.class, this.context, properties);
}
Once the component is placed inside an OSGi container, the start method will be called and set up the Camel context. This is all pretty straightforward Camel code. As the last step, the Camel context will be registered with the OSGi service layer. Setting the service property camel.context.id in the process. This property is important, as we will, later on, use it to locate the Camel context from the Kura Wires graph by it.
The Java DSL routes
The routes configuration is pretty simple Camel stuff. First, the REST DSL will be used to configure the REST API. For example, the “GET” operation to receive the currently active parameters:
…
  .get()
  .description("Get the current parameters")
  .outType(Parameters.class)
  .to("direct:getParameters")
…
This creates a get operation, which is being redirected to the internal “direct:getParameters” endpoint. Which is a way of forwarding that call to another Camel Route. This way Camel routes can be re-used from different callers.
Like for example the direct:updateParameters route, which will be called by all routes which want to update the parameters, no matter if that call originated in the IEC 60870, the REST or the Kura Wires component:
from("direct:updateParameters")
  .routeId("updateParameters")
  .bean(this.state, "updateCurrentParameters")
  .multicast()
  .to("direct:update.wires", "direct:update.iec.p1", "direct:update.iec.p2").end();
The route will forward the new parameters to the method updateCurrentParameters of the State class. This class is a plain Java class, holding the state and filling in null parameters with the current state. The result of this method will be forwarded to the other routes, for updating Kura Wires and the two parameters in the IEC 60870 data layer.
Trying it out
If you have Java and Maven installed, then you can simply compile the package by running:
cd camel/camel-example4
mvn clean package
This will compile, run the unit tests and create the .dp package in the folder target.
You can upload the package directly to your Kura instance. Please note that you do need the dependencies installed in part #1 of the tutorial. In additional you will need to install the following dependencies:
https://repo1.maven.org/maven2/de/dentrassi/kura/addons/de.dentrassi.kura.addons.camel.iec60870/0.6.1/de.dentrassi.kura.addons.camel.iec60870-0.6.1.dphttps://repo1.maven.org/maven2/de/dentrassi/kura/addons/de.dentrassi.kura.addons.camel.jetty/0.6.1/de.dentrassi.kura.addons.camel.jetty-0.6.1.dphttps://repo1.maven.org/maven2/de/dentrassi/kura/addons/de.dentrassi.kura.addons.camel.swagger/0.6.1/de.dentrassi.kura.addons.camel.swagger-0.6.1.dphttps://repo1.maven.org/maven2/de/dentrassi/kura/addons/de.dentrassi.kura.addons.camel.http/0.6.1/de.dentrassi.kura.addons.camel.http-0.6.1.dp
This will install the support for REST APIs, backed by Jetty. As Kura already contains Jetty, it only makes sense to re-use those existing components.
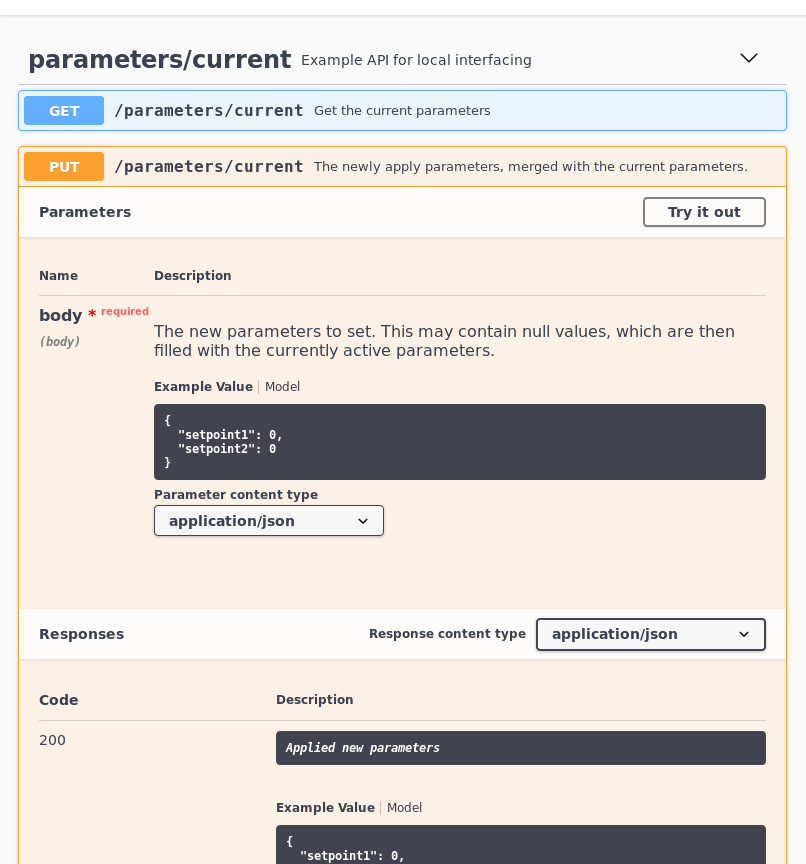
Once the component is deployed and started, you can navigate your web browser to http://:8090/api. This should bring up the Swagger UI, showing the API of the routes:
Next, you can create the following components in the Kura wires graph:
- Create a new “Camel consumer”, named
consumer2- Set the ID to
camel.example.4 - Set the endpoint URI to
seda:wiresOutput1
- Set the ID to
- Create a new “Logger”, named
logger2- Set it to “verbose”
- Connect
consumer2withlogger2 - Click on “Apply” to activate the changes
Open the console of Kura and then open the Swagger UI page with the Web browser. Click on ““Try Out” of the “PUT” operation, enter some new values for setpoint1 and/or setpoint2 and click on the blue “Execute” button.
In the console of Kura you should see the following output:
2018-09-17T13:35:49,589 [Camel (camel-10) thread #27 - seda://wiresOutput1] INFO  o.e.k.i.w.l.Logger - Received WireEnvelope from org.eclipse.kura.wire.camel.CamelConsume-1537188764126-1
2018-09-17T13:35:49,589 […] INFO  o.e.k.i.w.l.Logger - Record List content:
2018-09-17T13:35:49,589 […] INFO  o.e.k.i.w.l.Logger -   Record content:
2018-09-17T13:35:49,589 […] INFO  o.e.k.i.w.l.Logger -     P1 : 3.0
2018-09-17T13:35:49,589 […] INFO  o.e.k.i.w.l.Logger -     P2 : 2.0
2018-09-17T13:35:49,589 […] INFO  o.e.k.i.w.l.Logger -
This is the result of the “Logger” component from Kura Wires. Which did receive the new parameter updates from the Camel Context, as they got triggered through the Web UI. At the same time, the IEC 60870 server would update all clients being subscribed to those data items.
Wrapping it up
The last part of this tutorial showed that, if the prep-prepared XML router component of Eclipse Kura, is not enough, then you can drop in your own and powerful replacements. Developing with all the bells and whistles of Apache Camel, and still integrate with Kura Wires if necessary.